Cisco Device Basic Setup
In this post I am going to go through the basic setup on a Cisco device. Topics covered will be:
- Setting the hostname
- Setting up security
- Remotely accessing the device
For all the topics in the CCNA we can either use Packet Tracer or physical kit.
Note:
Packet Tracer might not display all commands available on a Cisco device.
Setting the hostname:
To set the hostname, you need to enter global configuration mode. Hostname is a command that affects whole the switch or router, and not just an interface.
1
2
3
4
5
6
Switch>
Switch>enable
Switch#configure terminal
Enter configuration commands, one per line.  End with CNTL/Z.
Switch(config)#hostname Sw1
Sw1(config)#
Once the hostname has been set, the prompt will change to the new hostname.
1
2
3
Switch#
!New hostname
Sw1#
Setting up passwords:
There are a number of different password settings that can be configured: console passwords, enable passwords and vty line passwords. The console password is used to restrict access to the device when connecting via a console cable. ie you have physical access to the switch. The console password is set in ‘line console 0’. You must set the password and also include the setting ‘login’ to enable the password:
1
2
3
4
5
6
7
8
9
10
11
12
13
14
15
16
17
18
19
Sw1#
Sw1#configure terminal
Enter configuration commands, one per line.  End with CNTL/Z.
Sw1(config)#line console 0
Sw1(config-line)#password ?
  7     Specifies a HIDDEN password will follow
  LINE  The UNENCRYPTED (cleartext) line password
Sw1(config-line)#password console_Pa$$word
Sw1(config-line)#login
Sw1(config-line)#end
Sw1#exit
Sw1 con0 is now available

Press RETURN to get started.

User Access Verification

Password:
Output:
1
2
3
4
5
6
7
8
9
10
11
12
13
Sw1#
Sw1#show run
Building configuration...
!
line con 0
 password console_Pa$$word
 login
!
line vty 0 4
 login
line vty 5 15
 login
!
The password is displayed in cleartext. To encrypt the password, another command is needed:
1
2
3
4
5
Sw1# configure terminal
Enter configuration commands, one per line.  End with CNTL/Z.
Sw1(config)#service password-encryption
Sw1(config)#end
Sw1#
Output:
1
2
3
4
5
6
7
8
9
10
11
12
Sw1#show run
Building configuration...
!
line con 0
 password 7 082243401A1609122D3B0D406E3C2B3A37
 login
!
line vty 0 4
 login
line vty 5 15
 login
!
The encrypted password however uses weak encoding that can easily be reversed
1
2
python.exe .\c7_decrypt.py -s 082243401A1609122D3B0D406E3C2B3A37
Insecure Password: console_Pa$$word
Another password that can be set is the enable password. This requires anyone who has access to the device who tries to make changes in privilege exec mode to input the password. It can be set either clear text or encrypted by using ‘enable password xxx’ or ‘enable secret xxx’. If both are used, the ‘enable secret’ overrides the ‘enable password’.
1
2
3
4
5
6
7
8
9
10
11
Sw1#
Sw1#configure terminal
Enter configuration commands, one per line.  End with CNTL/Z.
Sw1(config)#enable password ?
  7      Specifies a HIDDEN password will follow
  LINE   The UNENCRYPTED (cleartext) 'enable' password
  level  Set exec level password
Sw1(config)#enable password enable_Pa$$word
Sw1(config)#
Sw1(config)#end
Sw1#
Output:
1
2
3
4
5
6
7
8
9
10
11
12
13
Sw1>exit

Sw1 con0 is now available

Press RETURN to get started.

User Access Verification

Password: (console_Pa$$word)

Sw1>enable
Password: (enable_Pa$$word)
Sw1#
To use an encrypted password, use ‘enable secret’ instead. This uses md5 to create a hash of the password and store it in the configuration so it can’t be read. Md5 is a one-way hashing algorithm so the original password cannot be reversed. It can however be ‘cracked’ using a dictionary attack or a rainbow table containing a list of md5 hashes and their corresponding passwords. Newer switches may use Type 9 (scrypt) instead of Type 5 MD5.
1
2
3
4
5
6
7
Sw1>enable
Password:
Sw1#configure terminal
Enter configuration commands, one per line.  End with CNTL/Z.
Sw1(config)#enable secret secret_Pa$$word
Sw1(config)#end
Sw1#
Output:
1
2
3
4
5
6
7
8
9
10
11
12
13
14
15
16
17
Sw1#show run
Building configuration...

Current configuration : 1212 bytes
!
version 15.0
no service timestamps log datetime msec
no service timestamps debug datetime msec
no service password-encryption
!
hostname Sw1
!
enable secret 5 $1$mERr$1AKnkKzOtm0ezRWxHiMGF1
enable password enable_Pa$$word
!
!
!
Output:
1
2
3
4
5
6
7
8
9
10
11
12
13
Sw1>exit

Sw1 con0 is now available

Press RETURN to get started.

User Access Verification

Password: (console_Pa$$word)

Sw1>enable
Password: (secret_Pa$$word)
Sw1#
The last passwords that I will run through are the vty line passwords. These are used for telnet and ssh and set in ‘line vty’ mode. If setting up telnet, the ‘login’ command is also required. If setting up ssh, the ‘login local’ command is required along with a local username set. When logging in over telnet or ssh, the enable password must also be set.
Telnet:
1
2
3
4
5
6
7
8
9
Sw1#configure terminal
Enter configuration commands, one per line.  End with CNTL/Z.
Sw1(config)#line vty 0 15
Sw1(config-line)#password ?
  7     Specifies a HIDDEN password will follow
  LINE  The UNENCRYPTED (cleartext) line password
Sw1(config-line)#password vty_Pa$$word
Sw1(config-line)#end
Sw1#
Output:
1
2
3
4
5
6
7
8
!
line vty 0 4
 password vty_Pa$$word
 login
line vty 5 15
 password vty_Pa$$word
 login
!
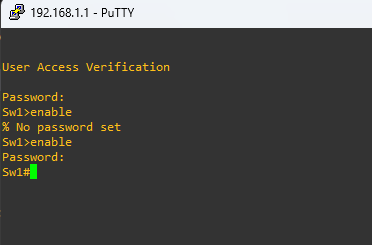 Connecting over telnet, first without enable password set, then with it set
Warning:
Telnet sends credentials in cleartext. SSH should be used instead and telnet only in homelab environments for learning (if at all)
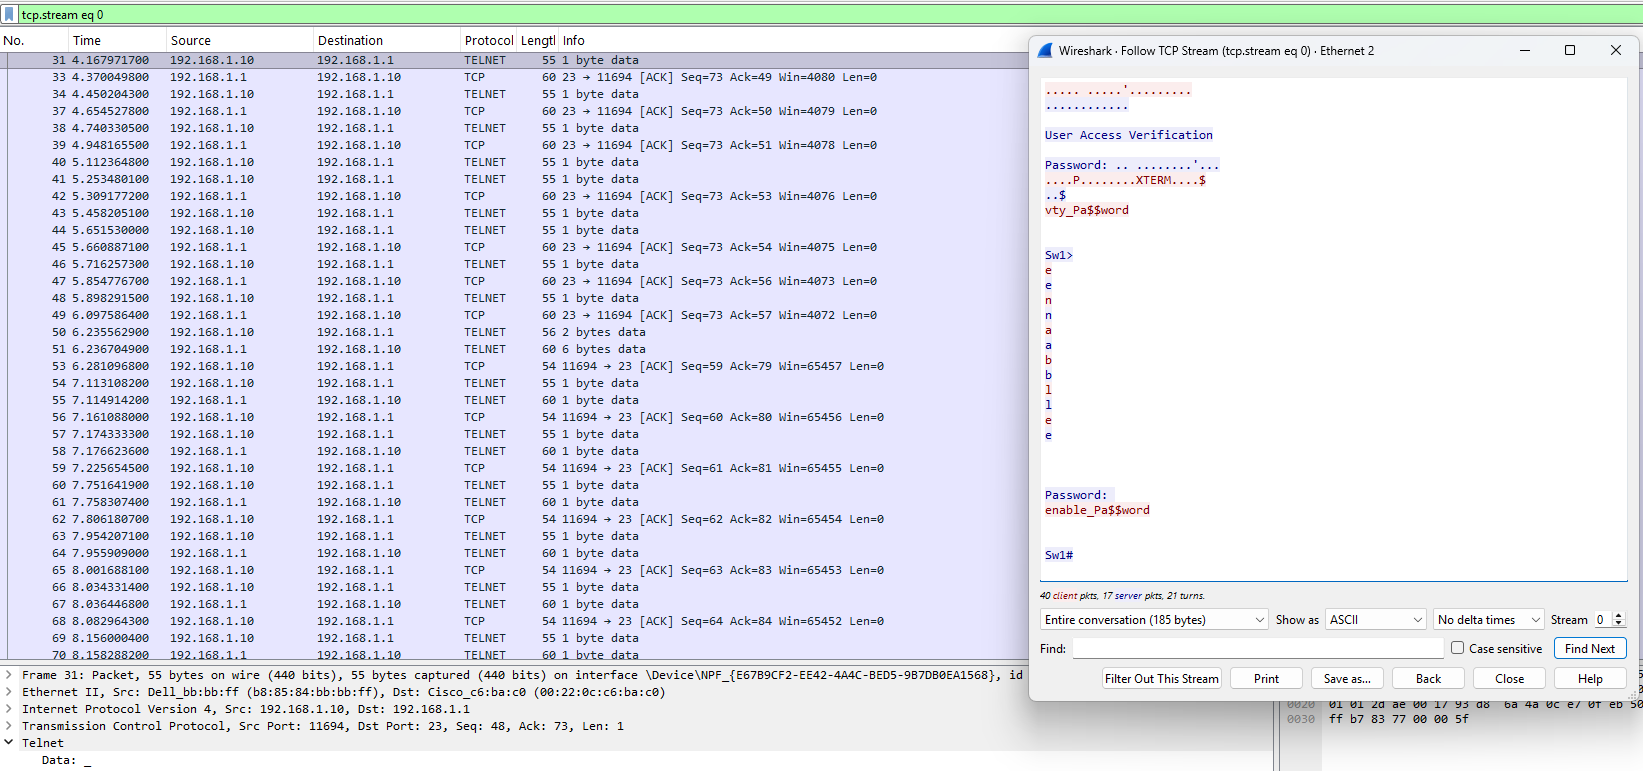 Wireshark capture displaying telnet credentials in cleartext
SSH:
SSH requires more setup to enable and is the recommended method over telnet. A domain name must be set and an RSA key then generated. You will need to set the transport input options to enable ssh login by using either ‘transport input telnet ssh’, ‘transport input all’ or only selecting one, ‘transport input ssh’. The version can also be set: ‘ssh version 2’. You will also need to set a username and password, as ssh requires a username whereas telnet does not.
1
2
3
4
5
6
7
8
9
10
11
12
13
14
15
16
17
18
19
20
21
22
23
24
25
26
27
Sw1#configure terminal
Enter configuration commands, one per line.  End with CNTL/Z.
Sw1(config)#line vty 0 15
Sw1(config-line)#transport input ?
  all     All protocols
  none    No protocols
  ssh     TCP/IP SSH protocol
  telnet  TCP/IP Telnet protocol
Sw1(config-line)#transport input telnet ssh
Sw1(config-line)#login local
Sw1(config-line)#exit
Sw1(config)#ip domain name lab.local
Sw1(config)#crypto key generate rsa
The name for the keys will be: Sw1.lab.local
Choose the size of the key modulus in the range of 360 to 2048 for your
  General Purpose Keys. Choosing a key modulus greater than 512 may take
  a few minutes.

How many bits in the modulus [512]: 1024
% Generating 1024 bit RSA keys, keys will be non-exportable...[OK]

Sw1(config)#
*Mar  1 00:17:14.583: %SSH-5-ENABLED: SSH 1.99 has been enabled
Sw1(config)#ip ssh version 2
Sw1(config)#username ssh_admin password ssh_Pa$$word
Sw1(config)#end
Sw1#
Output:
1
2
3
4
5
6
7
8
9
10
11
12
13
14
15
16
17
18
19
20
!
enable password enable_Pa$$word
!
username ssh_admin password 0 ssh_Pa$$word
!
!
ip ssh version 2
!
!
!
line vty 0 4
 password vty_Pa$$word
 login local
 transport input telnet ssh
line vty 5 15
 password vty_Pa$$word
 login local
 transport input telnet ssh
!
end
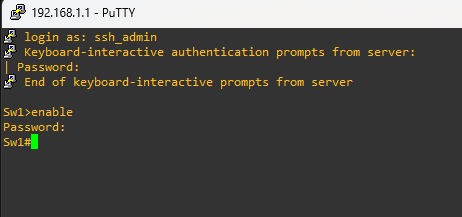 Connecting over ssh
 Wireshark capture displaying ssh encrypted traffic
Note:
Don’t forget to save!
1
2
3
4
5
Sw1#
Sw1#write
Building configuration...
[OK]
Sw1#